Wednesday, November 30, 2011

Love Embellishing T-Shirts with ribbon


My mom wanted a long sleeve t-shirt for the comfort, but she wanted it a little fancier so she could wear it with a skirt.  Enter 1/4 inch satin ribbon.


While sewing it on to the front of the collar only (needed the back to stretch over her head, ya know.) it ruffled.  After the first inch I was going to pick it out and start over, but then I thought, "I kinda like the ruffle effect."  So there it is.  Once again I mistakenly find something cute.  Love that it took three minutes.

Saturday, November 26, 2011

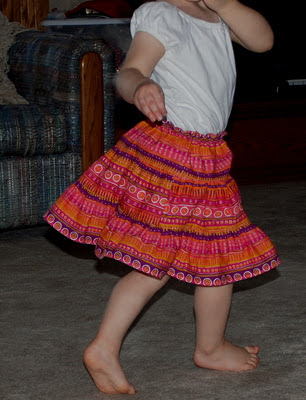
Twirly Whirly Skirt (aka gathered tiered skirt)

The fabric was so fun, it just called to be made into a tiered skirt.

I determined the length of the tiers rather randomly.  "Let's see, why not make them all about four inches."
I forgot that as you attach gathering to another layer, you lose some of the length.  Glad I made it longer than I needed.

To determine the width I was much more precise.  Waist x 1.5 for the first tier.  First tier x 1.5 for the second tier.  Second tier x 1.5 for the third tier.

The first step is to sew each tier together into a circle.  Right sides together, I always have to remind myself. My fabric was rather fray-ey after I washed it, so I used the serger with this step, and then serged all the sides. LOVE SERGERS!

Then I gathered one side of the third tier.  Thanks goes to Dana of MADE for teaching me an easier way to gather.  Life is easier now!  

Then I sewed the third tier to the second tier.  It's important while sewing a gathered fabric to a straight fabric to hold it carefully as it goes through the pressure foot, so that the gathered part doesn't pucker and fold under the seam.  That's why I sewed the seam first before serging it.

Then I serged that seam. (Did I mention this was pretty fray-ey fabric for being cotton?)

Then it was time to gather the second tier and attach it to the first tier.
Last of all, I turned under enough fabric at the top of the first tier to make an elastic casing. 

I sewed a line the width of the pressure foot from the edge first, to make the top a cute little gather-look as well.  Then I sewed a second line with enough room for my elastic to fit in between the two.  The second line I didn't finish--I left a gap wide enough to thread my elastic through.  How many times have I forgotten to leave the gap to thread the elastic?  Well, let's just say plenty.  If you forget, there's always the unpicker. (Sadly, he's a good friend.)
I cut elastic the same length as Kewpie Doll's waist measurement and attached a safety pin to one end.  Then I threaded it through the casing, making sure that the other end doesn't slide through as well.  (You could pin the other end down, but I hate having pins around when I'm touching fabric.  I always prick myself.  Sleeping Beauty makes it sound romantic to prick your finger.  It's not.)  A narrow zig-zag stitch will attach the two ends together, and then you can finish that second seam around the elastic.

All that's left now is to twirl.


Thanksgiving tree

I got this idea from many sources.  If you google thanksgiving tree, you'll see a lot of examples.  I used a little Christmas tree that we weren't using.

Then I cut out from colored paper a whole bunch of leaf shapes.  For a family activity we wrote down the things that we were thankful for.  Kewpie colored a few (and wrote down what she was thankful for.)
It was a good experience and is a great reminder.  We have it in the entryway.

Next time, I think I'll use a leaf template instead of cutting out shapes freehand.  Not all of them look like leaves.  And I'll include more that we can write on later, as new things we're grateful for come to mind.

Saturday, November 5, 2011

Orange you glad it's a dress?

Before we move into Christmas, I should share the Autumn dress I made for Xena Warrior Princess.


I took an existing shirt of a similar style, folded it in half, stretched it out and traced it onto paper.  After I cut it out it looked like this:

One side goes on the fold and I cut out four (so that, unfolded it makes two sides and two sleeves.


I sewed the sides together, sewed the sleeves on, and then made a casing for the elastic in the top.


I discovered at that moment that it was too short, so I made a ruffle.  Isn't everything better with a ruffle?


After hemming it, I felt like it needed something else, so I lined the bottom ruffle and sleeves with some orange ribbon.  Much better.

Xena wore it under an orange tutu with a pumpkin hat for Halloween.  The pumpkin hat idea I got from Delia at Delia Creates.

Please excuse this photo.  It's never easy to get a good shot of Xena Warrior Princess, because she's always moving.

Such an easy dress!  I love it!

NOTES FOR NEXT TIME:
The sleeve should be a little wider where the arm comes out if you want to gather it.
Take a chest measurement and apply it to the pattern with enough room to get in and out of the dress.  This one was cute, but Xena has to step into it to get it on, and Xena doesn't do that as well as over the head.