Showing posts with label Skirt. Show all posts

Tuesday, July 30, 2013

Denim Skirt upcycle from cut off jeans

I recently cut off some jeans to make jean shorts.  As I looked at the cut off legs, I thought they'd be cute as a skirt for Kewpie.

I washed them first, to get it to fray a little.  Then I opened up the two pant legs and sewed them to each other.  To finish the skirt, I took some blue elastic and sewed it to one end.


I love how easy it was, and how cute it turned out!  She wears it all the time, and it matches pretty much any shirt she's got.


Thursday, April 18, 2013

Circle Skirt from T shirt

I must give credit where it's due.  I first wanted to make a circle skirt after seeing Dana's of MADE.


But to actually make the skirt, I used the circle skirt calculator from the snugbug.  It is precise and amazing.


Since Kewpie has decided that she likes skirts more than pants or shorts, I wanted a skirt that she could wear like shorts.  Casual, fun, not show the dirt.


So I used an old heather gray t-shirt.


For the waistband, I did the same as a skirt I made for myself here. Super comfy, no need for elastic.


I must make more circle skirts. They even make walking more fun.


And it hangs so well.


As a side note, it might be noticeable that I haven't posted much as of late.  At the moment, life (baby and sickness) has taken over, and sewing was shoved into the back seat.  But I've woken from sewing dreams lately and my mind is brimming with ideas of fun things to do.  We'll see if real life will allow for those to become real.

Meanwhile, I'll post a few projects I didn't have time to post before, to appease my hunger to create again.

Thursday, October 18, 2012

Maxi skirt from a dress

I love a flowy-long skirt.  Always have.  I love that they're back in style.  


I set out with some super cute knit fabric to make me one, and got side-tracked by this dress.


What was wrong with this dress, you ask?  Well the reason it had been sitting in a box for fifteen years was because of an accidental sharpie mark right in front at the waistline.  It was also a little short--it hit my shins right at the point to make them seem bigger.  And I didn't have the slender stomach to wear it anymore.  But I never threw it out because it was such a comfortable dress and I loved it.  

You can see where I cut it off.  I figured the sharpie part wouldn't show past the folded-over waistband.


I was going to cut more off to make a waistband, but then I tried it on and realized that it was already tailored to sit on my hips.  So I just folded it down until it was exactly the length I wanted.  


This is excellent, because some of my shoes are taller than others, and I can lengthen or shorten the skirt accordingly.  Accidental genius.


PS. I'm Baa-ack!

Friday, July 20, 2012

Skirt from an extra large t-shirt

Warning:  we inherited a box full of very large t-shirts, so you're going to see a lot of ways to use a t-shirt. 


I love using t-shirts as the beginning of sewing with knits because there are already finished hems involved, so I don't have to try that out.

First off, I should send a thanks to Corinnea's Chaos for teaching me how to make a yoga-style waistband. What with my expanding waist, the comfort of this waistband is very appealing.  I'm not going to talk about the waistband.  She does such a better job at it than I would.


1.  I took my extra large t-shirt (it might even have been XXL) and laid it out flat.  Must be sure all the seams are lined up:  shoulders, sleeves, hem, etc.

2.  Then I laid my yard stick across the top as high as it could go, and still cut off the neckline.  Then I drew a line.

3.  Then I drew a similar line to cut off the sleeves. I used the sleeves to make the waistband.

It's important to be very gradual with this line, because if you could create not-so-cute little points where your seam ends unless you gradually blend into the side.


Let me show you what I mean.


See the not-cute point on my hip on one side and by my thigh on the other?


I should also mention that when you draw your lines, make sure that both sides are the same.  

4.  Ok, cut along the lines.

5.  Sew the sides, making sure to be gradual enough that you don't have those not-cute points.

6.  Sew the waistband to the top.  If you are in a really big hurry and don't want the comfort of a yoga waistband, then sew a very wide elastic to the top as shown here:

7.  Wear.  A lot, because it's cool and comfortable.  This is tighter than it might have been because I had to go back and redo my not-cute seams (are you tired of the the phrase not-cute yet?).


Even with the seam issue, it still didn't take more than an hour.  I'll bet next time I could do it in 20-30 minutes.  I think I'll make one in black, and pink, and, what other color t-shirts do I have?  Maybe I should stick a ruffle on it and make it a maxi-skirt.

Friday, June 22, 2012

Stripes and Lace Skirt

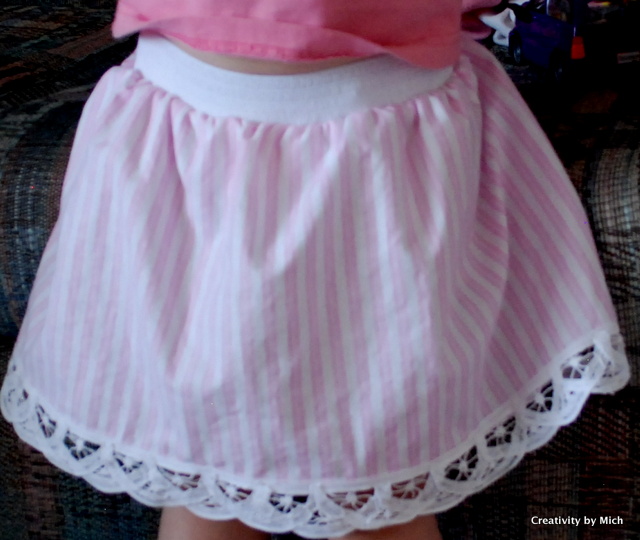
Such sweet pink and white striped fabric called to me to be made into something.  And an occasion gave me an excuse:  the birth of a little girl, the third little girl in this family.  So I made matching skirts for all of them.  


I made it pretty simple.  A straight skirt, about 1 1/2 times the width of the waist.  Then I lined the hem with some beautiful lace my mother-in-law gave me.


The exposed elastic has become my new favorite thing--because of the way it looks, the ease of sewing it in (I hate threading elastic through a casing.) and the comfort of it.


My elastic is about 1/3 inch shorter than the waist measurement, just because I've noticed that elastic stretches once it's sewn on, and my hipless three year old needs things to fit tight or they'll fall down.

Once I'd serged my elastic into a tube, I folded the elastic into fourths and pinned it.  Then I did the same thing with my skirt.  Then I matched the pins and pinned them together.


 Notice that the skirt is wider than the elastic?  When I sewed the two together, I pulled the elastic, and stretched it to the same length as the skirt.  This causes the skirt to gather.


A quick, simple, cute project.  Does that sound familiar?


Monday, May 21, 2012

Brocade Skirt

I absolutely love this fabric.


I chose it for my bridesmaids' skirts.

I still have mine.  (Don't tell me, bridesmaids, if you threw yours out.  I don't want to know.)

I discovered recently the runners my mom had made for the tables at my reception, and decided that I would make a matching skirt for Kewpie.

The runners were about this wide, so I serged them together and then gathered them and sewed them to a waistband that included an elastic casing.

Pretty simple, but with such intricate fabric, anything fancier would be too much.

My mom made a sweet toddler dress that fits Xena and now my two girls and I are matchy-matchy.

Thursday, April 5, 2012

My skirt makes a cute dress.

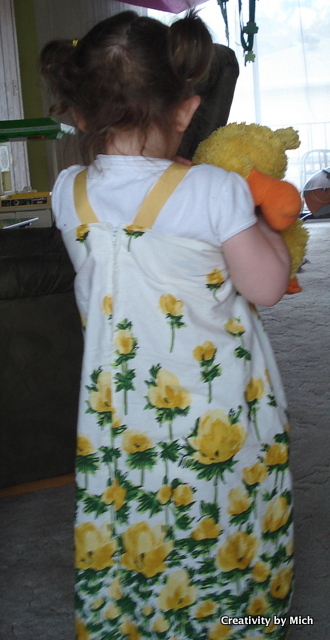
I once had this super cute skirt.

When I discovered that my hips would never be that size again, I couldn't bring myself to get rid of it.  It was so Spring-y and happy.  I discovered it in a box the other day, and decided that it was time for Kewpie to be wearing it.


Because Kewpie's chest is much smaller than my hips used to be, it needed to be smaller to fit her.  So I gathered the front in three rows.


Then I sewed some yellow ribbon on for straps. Simple, quick, easy, and now I can feel Spring again.


Saturday, November 26, 2011

Twirly Whirly Skirt (aka gathered tiered skirt)

The fabric was so fun, it just called to be made into a tiered skirt.

I determined the length of the tiers rather randomly.  "Let's see, why not make them all about four inches."
I forgot that as you attach gathering to another layer, you lose some of the length.  Glad I made it longer than I needed.

To determine the width I was much more precise.  Waist x 1.5 for the first tier.  First tier x 1.5 for the second tier.  Second tier x 1.5 for the third tier.

The first step is to sew each tier together into a circle.  Right sides together, I always have to remind myself. My fabric was rather fray-ey after I washed it, so I used the serger with this step, and then serged all the sides. LOVE SERGERS!

Then I gathered one side of the third tier.  Thanks goes to Dana of MADE for teaching me an easier way to gather.  Life is easier now!  

Then I sewed the third tier to the second tier.  It's important while sewing a gathered fabric to a straight fabric to hold it carefully as it goes through the pressure foot, so that the gathered part doesn't pucker and fold under the seam.  That's why I sewed the seam first before serging it.

Then I serged that seam. (Did I mention this was pretty fray-ey fabric for being cotton?)

Then it was time to gather the second tier and attach it to the first tier.
Last of all, I turned under enough fabric at the top of the first tier to make an elastic casing. 

I sewed a line the width of the pressure foot from the edge first, to make the top a cute little gather-look as well.  Then I sewed a second line with enough room for my elastic to fit in between the two.  The second line I didn't finish--I left a gap wide enough to thread my elastic through.  How many times have I forgotten to leave the gap to thread the elastic?  Well, let's just say plenty.  If you forget, there's always the unpicker. (Sadly, he's a good friend.)
I cut elastic the same length as Kewpie Doll's waist measurement and attached a safety pin to one end.  Then I threaded it through the casing, making sure that the other end doesn't slide through as well.  (You could pin the other end down, but I hate having pins around when I'm touching fabric.  I always prick myself.  Sleeping Beauty makes it sound romantic to prick your finger.  It's not.)  A narrow zig-zag stitch will attach the two ends together, and then you can finish that second seam around the elastic.

All that's left now is to twirl.