Wednesday, December 21, 2011

3 minute 3 ingredient Fudge

This is straight from V and Co via MADE.  We aren't mint people here, so when V and Co posted it, I wasn't interested, but when Dana suggested how to be creative with it, I had to try it out.  Who doesn't like lots of chocolate and nuts that doesn't take more than three minutes to make?

It really is as simple as it looks.I used 4 ingredients:
1 can sweetened condensed milk
1 bag Milk Chocolate Chips
1 bag some other kind of chips (peanut butter, butterscotch, dark chocolate, etc.)
Nuts of your choice.

Pour the chips and milk into a bowl and microwave until the chips are melted. Dana suggested doing it in 30 second bursts so as to not burn the chocolate, and she did have me scared, but after the first batch, I wasn't patient enough, so I did it for a minute and then twenty second bursts.


I dropped just one chocolate chip when opening a bag, and immediately Xena Warrior Princess was there to pop it in her mouth.  How did it get all over her clothes?


When the chips are melted and it stirs up rather smooth, pour it into a casserole dish. If you like it thick, use your 9x9 pan. They're pretty rich, though, so I think the larger pan would work too. I had a difficult time cutting into the first batch, because I'd waited until it was hard. The next batch, I let it cool for about ten minutes, and then pressed lines into it with a cutting board. Then I let it harden up completely so that it was easy to pull those little squares out.

Sorry, no more pictures of the finished product.  They have this strange ability to call my name, and if I look at them any more, the neighbors won't get any.

TOTALLY RECOMMEND! (and I'm not usually an all caps person.)

Tuesday, December 20, 2011

English Toffee (known in my family as Almond Roca)


Someone needs to explain to me the difference between toffee and roca, because I couldn't.  Growing up, this was my signature Christmas treat.  I was the expert and I always made it for the family.  And the family loved it.  My sister would beg for me to make some, as soon as the hint of Christmas was in the air.  I don't know why it's only a Christmas treat either, but maybe because it's indulgent to eat this much sugar, butter and chocolate, and Christmas is a time to indulge.  Something about this mixture makes it impossible to eat just one piece.  Mmmmm.


It's super simple:
1 cup butter
1 cup sugar
1 T corn syrup (makes it all stick together better, but it's not necessary.  I rarely make it with corn syrup because I don't have any.)
About 1 bag of chocolate chips or four squares of baker's chocolate.
as many nuts as you'd like.  We prefer walnuts, but the recipe calls for almonds (hence the name, Almond Roca.)


Some things that are helpful to prepare ahead of time are the chopped nuts.

Here's my setup:  I prepare a pan with wax paper spread over it. I use my largest cookie sheet.  I also have a small glass of ice water next to my stove. (I'll explain why in a moment.)  Then I'm ready to get started.


Combine the sugar, butter and corn syrup in a pan and bring to a boil on low. Boil on medium stirring constantly until it turns amber colored.

This is where the ice water comes in.   Whenever you think/hope it's done, drop a few drops in the water. If, after a few seconds, those drops are crunchy, then it's done. If they're still chewy, keep stirring.

When it's done, act quickly. Spread quickly over the wax paper until it is as thin as you can get it. It will harden quickly. Then set it aside.


Melt your chocolate. I usually melt 1/2 bag of chocolate chips at a time by pouring it in a bowl and microwaving it for 30 seconds and then stirring and microwaving it 30 seconds more and then stirring until it's smooth looking. (Best not to burn your chocolate in the microwave.)

Then I can dump the whole bowl onto the toffee and spread it around until it's the desired thickness (the thicker the chocolate the better in my book.) Quickly sprinkle the nuts over it, and then put the pan into the freezer. (The more quickly to harden the chocolate.)

Once the chocolate is hard, flip the whole slab over. I do this by placing another sheet of wax paper on it and flipping. Then I melt the second 1/2 of the chocolate chips, dump them on, sprinkle with nuts, and return to the freezer.


As soon as the chocolate is hardened, break into small pieces and eat.

I made this on a date with a dentist once, and he kept going off about how bad this is for your teeth. I didn't care, because it is SO GOOD. Needless to say, we had different priorities, and the relationship ended there.

Enjoy!

Sunday, December 4, 2011

Scrappy Pants


My mom has lots of fabric scraps.  She's the kind that hates to throw things out.  So she saves little scraps from things she's made.

I came upon scraps of this great green cordoroy that I just wanted to use.  But none of the scraps were big enough to use.  Not even for my little baby.


But I didn't let that get me down.  I pieced them together.  Then I used a pattern to cut them out.  Once you've cut them out, pants are so easy. Three seams and they're together:  two to sew the sides together and then one long seam around the inseam.

I used a wider elastic for the waist because wider elastics are easier on tummies. (Pregnancy taught me this.)


I simply serged the hem.  Next time I'll give it a real hem because I could have used the extra fabric when she grows.  They seem to grow longer before they grow wider.


I really like how the seams turned out.  It's kinda fun. 

Wednesday, November 30, 2011

Love Embellishing T-Shirts with ribbon


My mom wanted a long sleeve t-shirt for the comfort, but she wanted it a little fancier so she could wear it with a skirt.  Enter 1/4 inch satin ribbon.


While sewing it on to the front of the collar only (needed the back to stretch over her head, ya know.) it ruffled.  After the first inch I was going to pick it out and start over, but then I thought, "I kinda like the ruffle effect."  So there it is.  Once again I mistakenly find something cute.  Love that it took three minutes.

Saturday, November 26, 2011

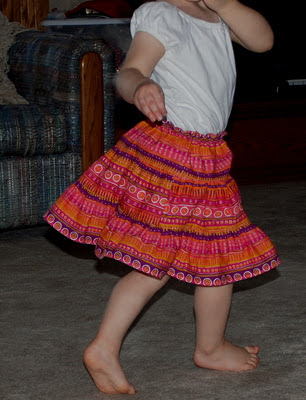
Twirly Whirly Skirt (aka gathered tiered skirt)

The fabric was so fun, it just called to be made into a tiered skirt.

I determined the length of the tiers rather randomly.  "Let's see, why not make them all about four inches."
I forgot that as you attach gathering to another layer, you lose some of the length.  Glad I made it longer than I needed.

To determine the width I was much more precise.  Waist x 1.5 for the first tier.  First tier x 1.5 for the second tier.  Second tier x 1.5 for the third tier.

The first step is to sew each tier together into a circle.  Right sides together, I always have to remind myself. My fabric was rather fray-ey after I washed it, so I used the serger with this step, and then serged all the sides. LOVE SERGERS!

Then I gathered one side of the third tier.  Thanks goes to Dana of MADE for teaching me an easier way to gather.  Life is easier now!  

Then I sewed the third tier to the second tier.  It's important while sewing a gathered fabric to a straight fabric to hold it carefully as it goes through the pressure foot, so that the gathered part doesn't pucker and fold under the seam.  That's why I sewed the seam first before serging it.

Then I serged that seam. (Did I mention this was pretty fray-ey fabric for being cotton?)

Then it was time to gather the second tier and attach it to the first tier.
Last of all, I turned under enough fabric at the top of the first tier to make an elastic casing. 

I sewed a line the width of the pressure foot from the edge first, to make the top a cute little gather-look as well.  Then I sewed a second line with enough room for my elastic to fit in between the two.  The second line I didn't finish--I left a gap wide enough to thread my elastic through.  How many times have I forgotten to leave the gap to thread the elastic?  Well, let's just say plenty.  If you forget, there's always the unpicker. (Sadly, he's a good friend.)
I cut elastic the same length as Kewpie Doll's waist measurement and attached a safety pin to one end.  Then I threaded it through the casing, making sure that the other end doesn't slide through as well.  (You could pin the other end down, but I hate having pins around when I'm touching fabric.  I always prick myself.  Sleeping Beauty makes it sound romantic to prick your finger.  It's not.)  A narrow zig-zag stitch will attach the two ends together, and then you can finish that second seam around the elastic.

All that's left now is to twirl.


Thanksgiving tree

I got this idea from many sources.  If you google thanksgiving tree, you'll see a lot of examples.  I used a little Christmas tree that we weren't using.

Then I cut out from colored paper a whole bunch of leaf shapes.  For a family activity we wrote down the things that we were thankful for.  Kewpie colored a few (and wrote down what she was thankful for.)
It was a good experience and is a great reminder.  We have it in the entryway.

Next time, I think I'll use a leaf template instead of cutting out shapes freehand.  Not all of them look like leaves.  And I'll include more that we can write on later, as new things we're grateful for come to mind.

Saturday, November 5, 2011

Orange you glad it's a dress?

Before we move into Christmas, I should share the Autumn dress I made for Xena Warrior Princess.


I took an existing shirt of a similar style, folded it in half, stretched it out and traced it onto paper.  After I cut it out it looked like this:

One side goes on the fold and I cut out four (so that, unfolded it makes two sides and two sleeves.


I sewed the sides together, sewed the sleeves on, and then made a casing for the elastic in the top.


I discovered at that moment that it was too short, so I made a ruffle.  Isn't everything better with a ruffle?


After hemming it, I felt like it needed something else, so I lined the bottom ruffle and sleeves with some orange ribbon.  Much better.

Xena wore it under an orange tutu with a pumpkin hat for Halloween.  The pumpkin hat idea I got from Delia at Delia Creates.

Please excuse this photo.  It's never easy to get a good shot of Xena Warrior Princess, because she's always moving.

Such an easy dress!  I love it!

NOTES FOR NEXT TIME:
The sleeve should be a little wider where the arm comes out if you want to gather it.
Take a chest measurement and apply it to the pattern with enough room to get in and out of the dress.  This one was cute, but Xena has to step into it to get it on, and Xena doesn't do that as well as over the head.

Monday, October 24, 2011

T-shirt neck embellishment

Once I stop sharing old projects I'll start taking before and after pictures. This was a t-shirt I got on clearance at Target and I love the color and the weight, but it was long sleeved, and who wears long sleeve, light weight t-shirts? If it's cold enough for long sleeves, it's too cold for t-shirts.


As you can see I cut off the sleeves at 3 quarter length and then used the fabric from the sleeves to make the neck.


I gathered it and pinned it around the neck and then top stitched it over the existing seam, so that this seam wouldn't show up.


It was very easy and very fast.


NOTES FOR NEXT TIME:
I would make the ruffle shorter, and maybe not as full.

Saturday, October 15, 2011

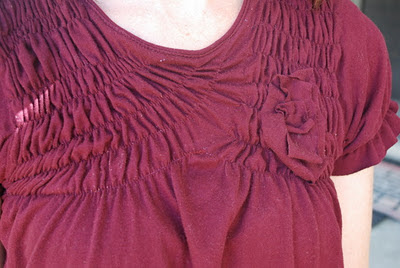
Extra Large T-Shirt Upcycle Via Shirring

This is a discarded shirt of my husbands.  I loved the color, so I tried to see how I could change it to work for me. For a discussion of shirring, click here.


I started shirring in rows across the front by one shoulder, and discovered after several rows that I was going crooked.  I thought it looked interesting, so I went with it, and repeated it on the other side.  I don't really like the way they met up in the middle.  


I cut two inches off the sleeves and sewed with elastic thread one inch from the edge. 


There was a logo on the left side that I covered with a flower.  I took a strip of fabric from what I cut off of the sleeves and wrapped it around to cover the logo.  Then I hand sewed it in place at certain points so that it would pucker.


In the back I sewed shirring lines straight across until it was even with the front.  If I were to do it again I would make the lines first in chalk and then sew them.  If you look closely, you can see how crooked the lines are.
I really like the length.  I intended this shirt to hide my postpartum tubbiness, and I think it does a good job of that.


Tuesday, October 4, 2011

Embellished T-Shirt via Rouching

I had this blue t-shirt that I loved because it was a soft knit and a pretty heather blue.  But it was boring and not cute.  So, taking my inspiration from a t-shirt my sister-in-law was wearing I rouched it! 

First of all, I loaded elastic thread in my machine.  For my discussion of elastic thread, click here:  I used a different machine, so the elastic thread was much more elastic-y.  I adjusted that with a tiny screw driver and  my bobbin holder.

Then I sewed a few inches up on both sides of the bottom hem.  I didn't want it too short and show any skin, so I decided to sew about 5 inches.  Important to measure so that the two lines are opposite each other.
 Then I sewed a line the entire length of the sleeve.  Again, it was important to measure so that I had the exact top of the sleeve.


It took me about 15 minutes!