Showing posts with label t-shirt. Show all posts

Thursday, July 26, 2012

Make it new with shirring

Don't hesitate to notice a trend here. As I grow out of my clothes, I've got maternity shirts on my mind.

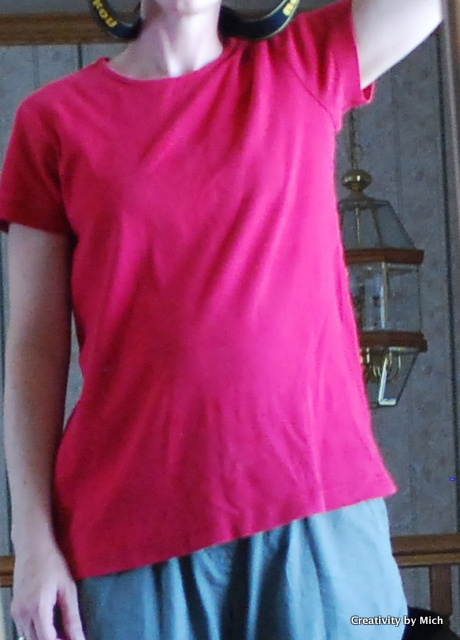
Before and after.  (Yes, these are the same shirt, but I didn't take them in the same light, silly me.)


Ode to a Hand-Me-Down Maternity Shirt
Oh, maternity shirt from my sister
I'm only going to wear you for a short time
So I'm glad to not spend any more money
But your boat-like boringness
Makes me feel the same when I wear you.
How can I make this pregnancy more exciting?


Well, let's start with that hem.  I unpicked the t-shirt hem. (Painful, but it gave me three more inches, and it was worth it.)


Then I shirred it with elastic thread seven rows.

If you'd like to know more about shirring, go here.  

No reason for the seven, rows, except that if I line up the last row along my pressure foot, then I get seven rows from the first unpicked seam to the bottom of the shirt.

Then the neckline.  I measured to the center of the neck, and then drew five lines about 4 inches long.  The distance between them was about 1/2 inch.  Then I sewed them with elastic thread.

Last of all, the sleeves:  I did NOT want to unpick any more seams, so I cut them off.   Then I sewed three lines about 8 inches long parallel to the edge of the sleeve., centered on the line down from the top of my shoulder.


I discovered that this line isn't along the shoulder seam, but a little more forward.  It was necessary to try the shirt on and put a pin where I wanted my center to be.

Pretty Fun, Huh?

Tuesday, April 10, 2012

T-shirt Dress


I found some bright and colorful t-shirts at the dollar store, and knew that my girls would be wearing t-shirt dresses for Easter.


I've been using the t-shirt pattern I made for the pajamas a lot. (Click here to see how that works.)

So after tracing the pattern on the t-shirt, I angled it from the arms eye to the bottom. ( I actually didn't take the line all the way to the bottom at first and there was an interesting bump where I ended my seam, so I went back and took it all the way down.)

That way, I kept the original hem, neckline and shoulder seam. (I still haven't mastered how to sew those things on knits without stretching them.)


I cut the sleeves to a much shorter length by measuring two inches from the original line.

Then I fit the sleeves into the arm's eye, right sides together.


As you can see, the sleeve was much too wide, so I sewed my widest stitch possible from three inches above the armpit seam around to three inches above it on the other side, leaving a lot of extra thread on both sides to pull when I gathered it.


With the bottom and top of the sleeve pinned in place, I pulled the thread on each side until the sleeve fit the hole.

Then I sewed the sleeve in place.


Came out looking like this.

I'm still not completely happy with my pattern.  It feels like the arm holes are too wide still.  I'll have to tweak it some more.


Xena is much smaller than Kewpie, and when I tried the initial t-shirt on her, I knew I'd have to do much more with the neck to make it seem less like it drowned her.


I took a seam ripper and cut along the inside of the neck ribbing.


Then I folded it over further and sewed it down, trimming the excess ribbing off after I sewed it.


If I hadn't been so lazy, I would have switched to matching thread, and it would have looked better.


Xena immediately got dirt all over her dress, before I could even get a picture of her.


I should have taken one anyway, but my mother-in-law did, and someday I'll get those photos from her and update this.


Kewpie loves this dress most of all, because it's the same color as her best friend, Duck.  


She even insisted that we take pictures of it, posed for me very cooperatively.  Note to self, if you make clothes they like, they'll let you take pictures of them.
The first dress took about 30 minutes to make.  I love me a quick project that turns out cute!


Tuesday, March 6, 2012

T-shirt Fancifying for the Two Year Old

Excuse the sad face.  Kewpie likes the shirt, just not the photographer.  She's two.

I had this plain small children's t-shirt in green that I got from the dollar store.  Kewpie is smaller than a children's small, though.  I'd put the t-shirt in my stash, waiting for inspiration, and when I saw it this week, I was inspired.  It is, after all, March.  The month to celebrate green.

First of all, I cut the t-shirt off completely an inch under the arms.

Then I took a t-shirt that fit her well, folded it in half, poked the sleeves in, and traced the body.


You could also trace a sleeve, but I discovered that I didn't need them..


Then I placed the pattern on the top of the t-shirt, lining it up with the top seams and neckline (I was still going to use those) and traced it with soap.  Then I cut around the arms and down.  (Sorry, forgot to photo that.)

I cut about an inch off the sleeve at the part where it meets the shirt to make it shorter.  Then I pinned and sewed the sleeves back in, but because the body was smaller now, the sleeves were too wide.  That made for a cute little pucker in the top of the sleeve.


Then I took the bottom part of the shirt, gathered it, and reattached it to the now smaller shirt.


Last of all, I tried it on Kewpie, and she gave her approval, whew!


I would say it took me about 30-45 minutes.

Now to ponder on how to embellish it.  A shamrock on the front?


Wednesday, November 30, 2011

Love Embellishing T-Shirts with ribbon


My mom wanted a long sleeve t-shirt for the comfort, but she wanted it a little fancier so she could wear it with a skirt.  Enter 1/4 inch satin ribbon.


While sewing it on to the front of the collar only (needed the back to stretch over her head, ya know.) it ruffled.  After the first inch I was going to pick it out and start over, but then I thought, "I kinda like the ruffle effect."  So there it is.  Once again I mistakenly find something cute.  Love that it took three minutes.

Monday, October 24, 2011

T-shirt neck embellishment

Once I stop sharing old projects I'll start taking before and after pictures. This was a t-shirt I got on clearance at Target and I love the color and the weight, but it was long sleeved, and who wears long sleeve, light weight t-shirts? If it's cold enough for long sleeves, it's too cold for t-shirts.


As you can see I cut off the sleeves at 3 quarter length and then used the fabric from the sleeves to make the neck.


I gathered it and pinned it around the neck and then top stitched it over the existing seam, so that this seam wouldn't show up.


It was very easy and very fast.


NOTES FOR NEXT TIME:
I would make the ruffle shorter, and maybe not as full.

Saturday, October 15, 2011

Extra Large T-Shirt Upcycle Via Shirring

This is a discarded shirt of my husbands.  I loved the color, so I tried to see how I could change it to work for me. For a discussion of shirring, click here.


I started shirring in rows across the front by one shoulder, and discovered after several rows that I was going crooked.  I thought it looked interesting, so I went with it, and repeated it on the other side.  I don't really like the way they met up in the middle.  


I cut two inches off the sleeves and sewed with elastic thread one inch from the edge. 


There was a logo on the left side that I covered with a flower.  I took a strip of fabric from what I cut off of the sleeves and wrapped it around to cover the logo.  Then I hand sewed it in place at certain points so that it would pucker.


In the back I sewed shirring lines straight across until it was even with the front.  If I were to do it again I would make the lines first in chalk and then sew them.  If you look closely, you can see how crooked the lines are.
I really like the length.  I intended this shirt to hide my postpartum tubbiness, and I think it does a good job of that.


Tuesday, October 4, 2011

Embellished T-Shirt via Rouching

I had this blue t-shirt that I loved because it was a soft knit and a pretty heather blue.  But it was boring and not cute.  So, taking my inspiration from a t-shirt my sister-in-law was wearing I rouched it! 

First of all, I loaded elastic thread in my machine.  For my discussion of elastic thread, click here:  I used a different machine, so the elastic thread was much more elastic-y.  I adjusted that with a tiny screw driver and  my bobbin holder.

Then I sewed a few inches up on both sides of the bottom hem.  I didn't want it too short and show any skin, so I decided to sew about 5 inches.  Important to measure so that the two lines are opposite each other.
 Then I sewed a line the entire length of the sleeve.  Again, it was important to measure so that I had the exact top of the sleeve.


It took me about 15 minutes!


Friday, September 23, 2011

Make a T-Shirt and Make it Pretty

Blog-land has been my inspiration. This project was a combination of two ideas. First of all, use an existing shirt to create a new shirt. Secondly, make cute embellishments from scraps.

First of all the shirt:
Not the cleanest or the prettiest job, but it proved to me that it could be done.

Using one of Kewpie's existing shirts, I turned it inside out and folded it in half. I traced that onto my fabric. I traced it in such a way that I had a back piece and a front piece. I used the same shirt to trace the sleeve. Then I sewed the shoulders together, sewed the tops of the sleeves in, and then sewed up the sides.

The neck is what I really don't like. I've made a few shirts since then, and I'm gradually getting better at the necklines in knits.

The instructions for a neckline are to take the ribbing, and right sides together, sew it around the neck. Then flip it around to the back and sew it on. What I didn't do then, but know about now, is that you're supposed to stretch the ribbing around the neck as you're sewing it. Because the ribbing is smaller than the neck, the neck doesn't look all stretched out. Didn't know that then.

I used a zig-zag to accommodate for stretch, but I think the zig-zag looks home-made. Someone I read about recently mentioned the necessity of using double needles with knits, and it sounds like this would solve my problem. I'll let you know when I try it out.

So here I was with this T-shirt I'd put effort into, and then neck looked terribly stretched out. So I turned to embellishments. Thanks to Delia Creates' tutorial, I figured out how to make roses out of fabric scraps. I sewed a few of them onto the front of the shirt by hand.

I feel like it turned out a lot better than it could have. Stay tuned for more T-shirt stuff. I keep trying and learning how to make T-shirts.