Showing posts with label Embellishment. Show all posts

Thursday, July 26, 2012

Make it new with shirring

Don't hesitate to notice a trend here. As I grow out of my clothes, I've got maternity shirts on my mind.

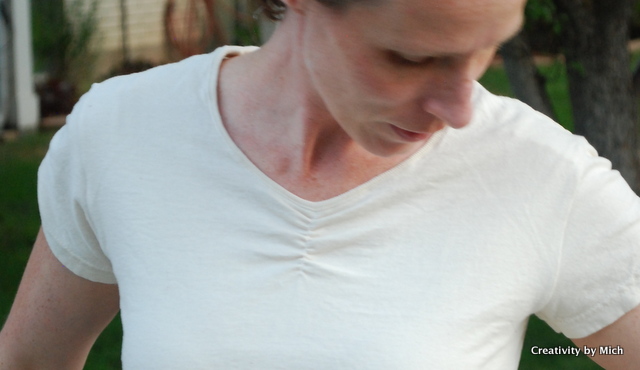
Before and after.  (Yes, these are the same shirt, but I didn't take them in the same light, silly me.)


Ode to a Hand-Me-Down Maternity Shirt
Oh, maternity shirt from my sister
I'm only going to wear you for a short time
So I'm glad to not spend any more money
But your boat-like boringness
Makes me feel the same when I wear you.
How can I make this pregnancy more exciting?


Well, let's start with that hem.  I unpicked the t-shirt hem. (Painful, but it gave me three more inches, and it was worth it.)


Then I shirred it with elastic thread seven rows.

If you'd like to know more about shirring, go here.  

No reason for the seven, rows, except that if I line up the last row along my pressure foot, then I get seven rows from the first unpicked seam to the bottom of the shirt.

Then the neckline.  I measured to the center of the neck, and then drew five lines about 4 inches long.  The distance between them was about 1/2 inch.  Then I sewed them with elastic thread.

Last of all, the sleeves:  I did NOT want to unpick any more seams, so I cut them off.   Then I sewed three lines about 8 inches long parallel to the edge of the sleeve., centered on the line down from the top of my shoulder.


I discovered that this line isn't along the shoulder seam, but a little more forward.  It was necessary to try the shirt on and put a pin where I wanted my center to be.

Pretty Fun, Huh?

Tuesday, July 24, 2012

Rouching to make the XL t-shirt maternity.

Most of the time innovations and ideas come because of needs.  I have a new need:  clothes that I can wear with an expanding belly.  Yes, I am expecting.  It might not look like much of a belly now, but I remember those sad days of the third trimester when nothing seemed to fit anymore.  This time, I'm preparing ahead of time.


I might have mentioned the plethora of XL t-shirts we have?  Well, this one was destined to be my experiment in making myself a maternity shirt.  Because of the experimental approach, and my lack of energy to do much but get-er-done, I don't have any photos of the process.  Hopefully, this will be understandable anyway.

1.  I created a t-shirt pattern for myself by tracing half of my favorite-fitting t-shirt without the sleeves.  I've done that several times.  See it here or here.    Then I lay that half-pattern over this large t-shirt and traced it again on both sides.  I only traced to my bustline, and let it out as quickly as I could without making it come to points as I mistakenly did here.

2.  I took the cut-off sleeves and trimmed away the part that had connected to the shirt until the sleeves were as long as I wanted them and wide enough to fit in the now-smaller armhole.  I have left the sleeves wider, and made them ruffle at the shoulder before, and that is cute too.  Check it out here.

3.  Then I sewed the sleeves in and sewed up the open parts of the sides.  

The t-shirt now fits, but it is rather boring and balloon-like.  How can I make it cuter? 

Lets start with the sides.  I tried this before here, and rather liked it.  With my elastic thread in my bobbin, I sewed up both sides to my bustline.  Then I sewed up the crest of the sleeve as well.  This is what happened.


The top fits me well, and there's plenty of room around my waist.  Perfect.

Now for the neck.  I'm going to avoid any sewn-on embellishments at the moment because I'm worried about my grabby toddler, but some cute flowers or yo-yos could be fun at the neckline.

I wanted a smaller ribbing around the neck, so I trimmed it, like I did here.  It makes the neck less stretchy, but it looks less casual as well.

Then I took that elastically-threaded bobbin, and sewed a few inches down from the neck, making it into a V-neck.  


It doesn't look much like the shirt it was before.

I love how roomy it is. (I'm actually wearing it as I type this.)

Wednesday, November 30, 2011

Love Embellishing T-Shirts with ribbon


My mom wanted a long sleeve t-shirt for the comfort, but she wanted it a little fancier so she could wear it with a skirt.  Enter 1/4 inch satin ribbon.


While sewing it on to the front of the collar only (needed the back to stretch over her head, ya know.) it ruffled.  After the first inch I was going to pick it out and start over, but then I thought, "I kinda like the ruffle effect."  So there it is.  Once again I mistakenly find something cute.  Love that it took three minutes.

Monday, October 24, 2011

T-shirt neck embellishment

Once I stop sharing old projects I'll start taking before and after pictures. This was a t-shirt I got on clearance at Target and I love the color and the weight, but it was long sleeved, and who wears long sleeve, light weight t-shirts? If it's cold enough for long sleeves, it's too cold for t-shirts.


As you can see I cut off the sleeves at 3 quarter length and then used the fabric from the sleeves to make the neck.


I gathered it and pinned it around the neck and then top stitched it over the existing seam, so that this seam wouldn't show up.


It was very easy and very fast.


NOTES FOR NEXT TIME:
I would make the ruffle shorter, and maybe not as full.

Saturday, October 15, 2011

Extra Large T-Shirt Upcycle Via Shirring

This is a discarded shirt of my husbands.  I loved the color, so I tried to see how I could change it to work for me. For a discussion of shirring, click here.


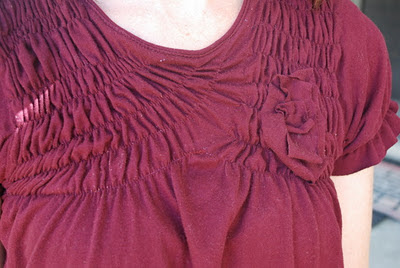
I started shirring in rows across the front by one shoulder, and discovered after several rows that I was going crooked.  I thought it looked interesting, so I went with it, and repeated it on the other side.  I don't really like the way they met up in the middle.  


I cut two inches off the sleeves and sewed with elastic thread one inch from the edge. 


There was a logo on the left side that I covered with a flower.  I took a strip of fabric from what I cut off of the sleeves and wrapped it around to cover the logo.  Then I hand sewed it in place at certain points so that it would pucker.


In the back I sewed shirring lines straight across until it was even with the front.  If I were to do it again I would make the lines first in chalk and then sew them.  If you look closely, you can see how crooked the lines are.
I really like the length.  I intended this shirt to hide my postpartum tubbiness, and I think it does a good job of that.


Tuesday, October 4, 2011

Embellished T-Shirt via Rouching

I had this blue t-shirt that I loved because it was a soft knit and a pretty heather blue.  But it was boring and not cute.  So, taking my inspiration from a t-shirt my sister-in-law was wearing I rouched it! 

First of all, I loaded elastic thread in my machine.  For my discussion of elastic thread, click here:  I used a different machine, so the elastic thread was much more elastic-y.  I adjusted that with a tiny screw driver and  my bobbin holder.

Then I sewed a few inches up on both sides of the bottom hem.  I didn't want it too short and show any skin, so I decided to sew about 5 inches.  Important to measure so that the two lines are opposite each other.
 Then I sewed a line the entire length of the sleeve.  Again, it was important to measure so that I had the exact top of the sleeve.


It took me about 15 minutes!


Friday, September 23, 2011

Make a T-Shirt and Make it Pretty

Blog-land has been my inspiration. This project was a combination of two ideas. First of all, use an existing shirt to create a new shirt. Secondly, make cute embellishments from scraps.

First of all the shirt:
Not the cleanest or the prettiest job, but it proved to me that it could be done.

Using one of Kewpie's existing shirts, I turned it inside out and folded it in half. I traced that onto my fabric. I traced it in such a way that I had a back piece and a front piece. I used the same shirt to trace the sleeve. Then I sewed the shoulders together, sewed the tops of the sleeves in, and then sewed up the sides.

The neck is what I really don't like. I've made a few shirts since then, and I'm gradually getting better at the necklines in knits.

The instructions for a neckline are to take the ribbing, and right sides together, sew it around the neck. Then flip it around to the back and sew it on. What I didn't do then, but know about now, is that you're supposed to stretch the ribbing around the neck as you're sewing it. Because the ribbing is smaller than the neck, the neck doesn't look all stretched out. Didn't know that then.

I used a zig-zag to accommodate for stretch, but I think the zig-zag looks home-made. Someone I read about recently mentioned the necessity of using double needles with knits, and it sounds like this would solve my problem. I'll let you know when I try it out.

So here I was with this T-shirt I'd put effort into, and then neck looked terribly stretched out. So I turned to embellishments. Thanks to Delia Creates' tutorial, I figured out how to make roses out of fabric scraps. I sewed a few of them onto the front of the shirt by hand.

I feel like it turned out a lot better than it could have. Stay tuned for more T-shirt stuff. I keep trying and learning how to make T-shirts.

Amazing Shirt

The Man had a sister (still does) who was having a birthday, and we had no idea what to give her. So we made her something that she couldn't get for herself. He picked out the fabrics, and I cut them out and zig-zagged them onto the shirt. Pretty simple, quick and fun!

If I were to do it again, I would find a way to either use fabric that doesn't fray or to iron the edge of each letter under so that the fraying edge wasn't sticking out. The Man thought it gave a fun texture to the shirt. I dunno.