Sunday, April 29, 2012

Growing Creatively

Pinterest has changed me.
In the sense that I started growing my garden long before it was warm enough.  I found a pin from skruben.blogspot.com, and once I read her explanation, I had to try it out myself.  As you can tell, it works!

It was such a good idea  They used soda bottles, but we have more juice around than soda.  So you cut it off about 1/3 from the top, poke a hole in the lid, and run a string or yarn through the hole, and then fill the top 1/3 with soil and plant your seeds.  Thoroughly wet everything, and then fill the bottom with water.  The string acts as a wick to pull moisture into the soil when needed, keeping everything at its preferred level of moisture.  And I just have to notice when it has run out of water.

I have enjoyed watching these fellows grow, and I'm almost reluctant to banish them to the garden.

The empty looking container in the middle is oregano.  Look, they're beginning to sprout!

Sunday, April 22, 2012

Pants Crazy!

I've been going crazy about making pants!  It was partly motivated by the fact that my Kewpie Doll is sprouting and her pants are shrinking, so she needed some more pants. Part of my motivation is how easy and quick it is to make pants.  Let me show you!  


I traced a pair of Kewpie's pants that fit her well.


And made a pants pattern that I have been using on EVERYTHING!

Notice that I cut two of the same pattern, with the straight line on the fold.  My pattern wasn't as long as Kewpie needs, so I measured her best fitting pants from the crotch to the ankle and used that number to determine the end of her pants.

Remember my summer-time pajamas?  Made from the pattern above.

I really love taking a wide elastic, stretching it across the fabric, and sewing directly to the waist instead of making a casing.  So much easier!  It's helpful to pin the waist in quadrants and the elastic in quadrants and attaching them together that way, so you know you're sewing the elastic on semi-equally all the way around.

I also made some sweats out of scraps of an old t-shirt.  Made from the same pattern.

I used the hem of the old shirt at the waist, cut notches for the drawstring to go through, and I already had my drawstring casing. Super fast, super easy, and Kewpie is delighted to have work out sweats just like mine!


I cut off the sleeves of an old cardigan, spread them out on my pattern and cut them to make ribbed leggings.


  I sewed an elastic at the top, and they were ready to wear!


It feels like these leggings were too wide, and therefore got a little baggy.  I might go back and sew it more narrow.

But then, it was an old cardigan, and perhaps there's not much stretch left in it.


I made the pattern a little wider to make these cotton elastic waist pants.


I'm learning that the same front and back works fine for tight-fitting pants, like leggings, but is less comfortable in looser pants, like these.

The problem is that we just aren't the same in the front as we are in the back!


Last of all, I took one of my old layering t-shirts and cut it up to make leggings to go under dresses.


I used the hem of the t-shirt so that I wouldn't have to hem the leggings 


(I'm so scared of hemming knits.  I can't help but stretch them.)


I sewed an elastic directly to the top of the leggings.
That's the end for now.


I'll be back with more!

Thursday, April 12, 2012

Chandelier Hangings

We have a chandelier in a room that once was a dining room but now is a playroom.
It is a bit of a hazard.  A few of the taller people in the house hit their heads on it regularly.

Or they did until I got creative and started hanging colorful ornaments from it at Christmas.  When we cleaned up from Christmas, it was perfect to hang snowflakes on it, and then hearts in February, replaced by shamrocks in March and Easter eggs in April.


But Easter is over, and I'm wondering what to hang next.  There aren't any great themed holidays coming up soon.  What shall I hang on my chandelier?

Tuesday, April 10, 2012

T-shirt Dress


I found some bright and colorful t-shirts at the dollar store, and knew that my girls would be wearing t-shirt dresses for Easter.


I've been using the t-shirt pattern I made for the pajamas a lot. (Click here to see how that works.)

So after tracing the pattern on the t-shirt, I angled it from the arms eye to the bottom. ( I actually didn't take the line all the way to the bottom at first and there was an interesting bump where I ended my seam, so I went back and took it all the way down.)

That way, I kept the original hem, neckline and shoulder seam. (I still haven't mastered how to sew those things on knits without stretching them.)


I cut the sleeves to a much shorter length by measuring two inches from the original line.

Then I fit the sleeves into the arm's eye, right sides together.


As you can see, the sleeve was much too wide, so I sewed my widest stitch possible from three inches above the armpit seam around to three inches above it on the other side, leaving a lot of extra thread on both sides to pull when I gathered it.


With the bottom and top of the sleeve pinned in place, I pulled the thread on each side until the sleeve fit the hole.

Then I sewed the sleeve in place.


Came out looking like this.

I'm still not completely happy with my pattern.  It feels like the arm holes are too wide still.  I'll have to tweak it some more.


Xena is much smaller than Kewpie, and when I tried the initial t-shirt on her, I knew I'd have to do much more with the neck to make it seem less like it drowned her.


I took a seam ripper and cut along the inside of the neck ribbing.


Then I folded it over further and sewed it down, trimming the excess ribbing off after I sewed it.


If I hadn't been so lazy, I would have switched to matching thread, and it would have looked better.


Xena immediately got dirt all over her dress, before I could even get a picture of her.


I should have taken one anyway, but my mother-in-law did, and someday I'll get those photos from her and update this.


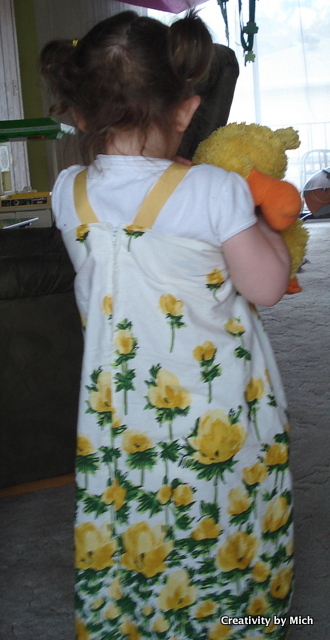
Kewpie loves this dress most of all, because it's the same color as her best friend, Duck.  


She even insisted that we take pictures of it, posed for me very cooperatively.  Note to self, if you make clothes they like, they'll let you take pictures of them.
The first dress took about 30 minutes to make.  I love me a quick project that turns out cute!


Thursday, April 5, 2012

My skirt makes a cute dress.

I once had this super cute skirt.

When I discovered that my hips would never be that size again, I couldn't bring myself to get rid of it.  It was so Spring-y and happy.  I discovered it in a box the other day, and decided that it was time for Kewpie to be wearing it.


Because Kewpie's chest is much smaller than my hips used to be, it needed to be smaller to fit her.  So I gathered the front in three rows.


Then I sewed some yellow ribbon on for straps. Simple, quick, easy, and now I can feel Spring again.