Friday, September 23, 2011

Quick Puppy Dog Costume

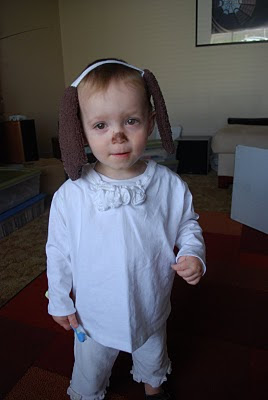
I hadn't planned on dressing up for Halloween last year. Kewpie Doll goes to bed so early, and she wasn't really old enough to "get" trick or treating. But my parents planned a family Halloween party, so at the last moment, I had to come up with a costume for her. Her favorite thing at that moment was puppies, so I let that be my inspiration. Using the white t-shirt I'd just made her and white pants, all I needed was ears and a tail.

To make the ears, I took a brown wash cloth.

I cut two pieces into twice the size I wanted, sewed three sides together, and then turned it inside out. These are the ears. I attached them to a white ribbon, which I tied around Kewpie's head.


Using what was left over from the towel, I rolled it into a tube and hand sewed it closed. Then I rolled it up and put a book on it. That gave it just enough curl to curl up a bit.


Which is how Kewpie Doll became her favorite animal.


Make a T-Shirt and Make it Pretty

Blog-land has been my inspiration. This project was a combination of two ideas. First of all, use an existing shirt to create a new shirt. Secondly, make cute embellishments from scraps.

First of all the shirt:
Not the cleanest or the prettiest job, but it proved to me that it could be done.

Using one of Kewpie's existing shirts, I turned it inside out and folded it in half. I traced that onto my fabric. I traced it in such a way that I had a back piece and a front piece. I used the same shirt to trace the sleeve. Then I sewed the shoulders together, sewed the tops of the sleeves in, and then sewed up the sides.

The neck is what I really don't like. I've made a few shirts since then, and I'm gradually getting better at the necklines in knits.

The instructions for a neckline are to take the ribbing, and right sides together, sew it around the neck. Then flip it around to the back and sew it on. What I didn't do then, but know about now, is that you're supposed to stretch the ribbing around the neck as you're sewing it. Because the ribbing is smaller than the neck, the neck doesn't look all stretched out. Didn't know that then.

I used a zig-zag to accommodate for stretch, but I think the zig-zag looks home-made. Someone I read about recently mentioned the necessity of using double needles with knits, and it sounds like this would solve my problem. I'll let you know when I try it out.

So here I was with this T-shirt I'd put effort into, and then neck looked terribly stretched out. So I turned to embellishments. Thanks to Delia Creates' tutorial, I figured out how to make roses out of fabric scraps. I sewed a few of them onto the front of the shirt by hand.

I feel like it turned out a lot better than it could have. Stay tuned for more T-shirt stuff. I keep trying and learning how to make T-shirts.

Dress Upcycle: Sundress with Elastic Thread AKA shirring

My sister gave me an 80's style maternity dress. Such cute fabric, but not a style I'd like to wear. I should have taken a photo of it before I took it apart, but here's the top.

Imagine a very full, ankle length skirt underneath it.

So I took off the skirt, as you can see. I'd just been reading all sorts of things in blog-land about elastic thread and I wanted to try it out for myself. So with trepidation, I loaded the thread in my machine and gave it a shot. I found out months later that I had loaded it wrong. But more about that later.

Before using the elastic thread, I created a great big rectangle tube that would fit around me with plenty of room for growth. (This was to accommodate a growing tummy.) The usual rule is about 1.5 times your hip width is a good looking gather. I did it twice the width.

I hemmed the top and bottom with a simple rolled hem. (Actually it was a double rolled hem, because this fabric qualifies as super fray-able)

I wound the elastic thread into my bobbin by hand, making sure not to stretch it. I was using an old singer sewing machine that my grandmother gave me. It is as old as my mother. It had a drop-in bobbin, which I've heard can be problematic. But my trusty old singer came through for me. If your drop-in bobbin causes problems, you should probably look at how tight the bobbin tension is, because that is what stretches the thread. That is what I did wrong.

So, using normal, white thread on top, and elastic thread on the bottom, I sewed in a circle about 1/2 inch from what I had determined was the top of the dress. It was a little gathered, but not a lot. But I didn't give up. When I reached the end of my first circumference of the dress, I simply aimed the foot down a little and kept about 1/2 inch between my foot and the last seam I'd sewn. This went on for what seemed like days. :). Each row I sewed made the row before it a little more gather-y. Finally, after about ten rows, I decided that it was long enough. So I stopped and made sure to really end with a knot, so the elastic wouldn't come undone.


The next step was straps. I discussed straps here, and I stand by what I said. :) Luckily I have a model that I could put the dress on and see where I wanted the straps. They don't look best or work best right across from each other. On the front they should be a little closer to the sides, and on the back they should be closer to the middle. This helps them to not fall off as easily, which prevents cursing.

Then I was done! Wahoo!

But wait, remember the top?
I took off the lace, unpicked the side seams and side arm seams, used the neck facing to make my elastic facing, made a random, uneven hem and made a skirt/dress for Kewpie Doll.
I rather love the way the sleeves make it flare in places. It was long enough that I put straps on it and Kewpie had a matching sun dress. Now, she wears it as a skirt.

Sadly, I couldn't find a photo of Kewpie wearing it. She wasn't one to hold still at this point in her life.

Amazing Shirt

The Man had a sister (still does) who was having a birthday, and we had no idea what to give her. So we made her something that she couldn't get for herself. He picked out the fabrics, and I cut them out and zig-zagged them onto the shirt. Pretty simple, quick and fun!

If I were to do it again, I would find a way to either use fabric that doesn't fray or to iron the edge of each letter under so that the fraying edge wasn't sticking out. The Man thought it gave a fun texture to the shirt. I dunno.


Doll Dress


We were given this doll by a neighbor, but she'd lost her clothes long ago. I couldn't handle her running around naked all the time, but I wasn't confident enough to make her anything with sleeves or legs, so I went for the basic sundress.

Make the dress: Cut out a rectangle the width of her chest and long enough to cover her. Sew it into a tube, right sides together. Turn it inside out. A perfectionist would iron the seam at this point.

Make straps: Cut out long skinny rectangles the length you want the straps. You'll need to have them wide enough that you can pull them inside out.

The thickness of your fabric determines that: the thicker the fabric, the wider they must be. Sew them inside out lengthwise. I made them too skinny at first and after much anger, made new ones that I actually could turn inside out.

It helps at this point to have one of those cool things I got from my grandma that grabs the end and pulls it through, but before I discovered this, I attached a safety pin to one side and pulled it through to the other side until it was right side out. Now the seam in on the inside!

Even non-perfectionist me understands that straps work much better being ironed at this point. Might as well iron the rest of the seams as well, since you have the iron out. :)

If you want even more of the seam on the inside, you could sew one end together as well as the sides. You just need one open side to turn it inside out. Repeat this for your second strap.

Sew your straps to the sides of the tube and there's your dress!

I must apologize for the unclear photo of the dress. This is our normal view of it. And our little Kewpie Doll is much cuter than the doll anyway. :)

Why I got into crafts

When I was in college, I was asked to lead our women's group in home making activities. Besides the fact that we were all in our early twenties and lived in college apartments, I had no interest in any activities having to do with crafts and making home more livable. I focused on activities that helped us develop our personalities and hobbies, and was relieved that I didn't have to do any crafts.

When I graduated from college, I was too busy working. My creative urge went into my job and my hobbies. I took up guitar, spent a lot of time outdoors, and learned to love photography.

I first started making things in graduate school. I'm not the kind who likes to sit still, so four hours of class was torture for me. I "borrowed" my mom's yarn and crochet hooks and started crocheting scarves in class. During those two years, I made several, for me and my classmates.

I have my mom to thank for that. She taught me how to crochet and sew because she believed every woman should know that. I know it wasn't easy for her, because I was not an eager learner. Now, I'm so glad I learned. I also have my mom to thank for all of the supplies she let me "borrow." I need to start paying her back.

When my first child came along, I decided to stop working and stay home with her. Taking care of a child is a full time job, and I was busy, but I missed the creative outlets of work and hobbies. Some hobbies, I've kept, as you might see in my photography blog, whitmanwithacamera. Others, such as rock climbing, will have to wait until my children are older.

While I was at home, I discovered online the crafting blogs. I was amazed at these wonder women, who were able to raise their kids, keep their houses in order, make amazing craft tutorials and blog on a regular basis about it.

I am not that woman. I like to make things, because it gives me a sense of accomplishment that raising children can't give because THAT work is never done. But I am not the kind of woman who can do it all, so when I have to make choices, I'll feed and play with my children and dress them and change their diapers and then clean a little and then worry about the yard and garden and then if they happen to be asleep at the same time, create things. I wish I had more time to create, but I wouldn't trade my beautiful little girls for that.

My purpose for this blog is to record what I've done so that I won't forget how I did it. It doesn't seem likely that anyone other than my friends would want to see what I've done, but if you can use my instructions, you're welcome to them.

My pictures are precious to me because of the models I use to show off what I've done. The pictures are my property. Please do not use them without my written permission.